一.建置Cordova專案
1.開啟Visual Studio 2017 / 檔案 / 新增 / 專案 / 其它語言 / JavaScript / Mobile App / 空白應用程式(Apache Cordova)
二、Mac book 安裝remotebuild
1.安裝node
2.安裝xcode,安裝完後請執行xcode
3.執行xcode -select –install
4.執行npm install -g ios-deploy
一直失敗,後來改成如下指令就安裝成功了
sudo npm install -g ios-deploy –unsafe-perm=true –allow-root
5.執行sudo npm install -g remotebuild (含homebrew安裝)
並執行以下3指令
1) brew install libimobiledevice –HEAD
2) brew install ios-webkit-debug-proxy
3) brew install libimobiledevice
6.執行
1) 安全模式 : remotebuild
2) 非安全模式 : remotebuild –secure false
7.執行後,再執行remotebuild saveconfig產生組態,
請至/Users/grace/.taco_home/路徑查看RemoteBuild.config,
請記下hostname、port (若為安全模式,應該還有pin碼)
PS.我用hostname不行,後來改用IP => ifconfig | grep “inet “取得
8.啟動xcode及remotebuild
三、設定Visual Studio 2017Visual Studio 2017 * Cordova for iOS debug
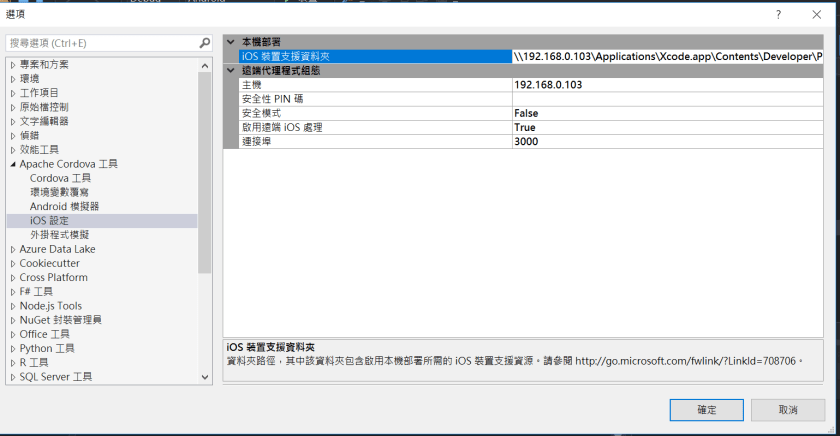
1.開啟Visual Studio 2017 / 工具 / 選項 / Apache Cordova 工具 / iOS設定 /
iOS裝置支援資料夾 :
Ex.[IP]\Applications\Xcode.app\Contents\Developer\Platforms\iPhoneOS.platform\DeviceSupport\
2.Visual Studio專案需新增build.json
1) 申請開發者帳號,以取得Team Id
2) build.json設定如下,其中developmentTeam請用Team Id
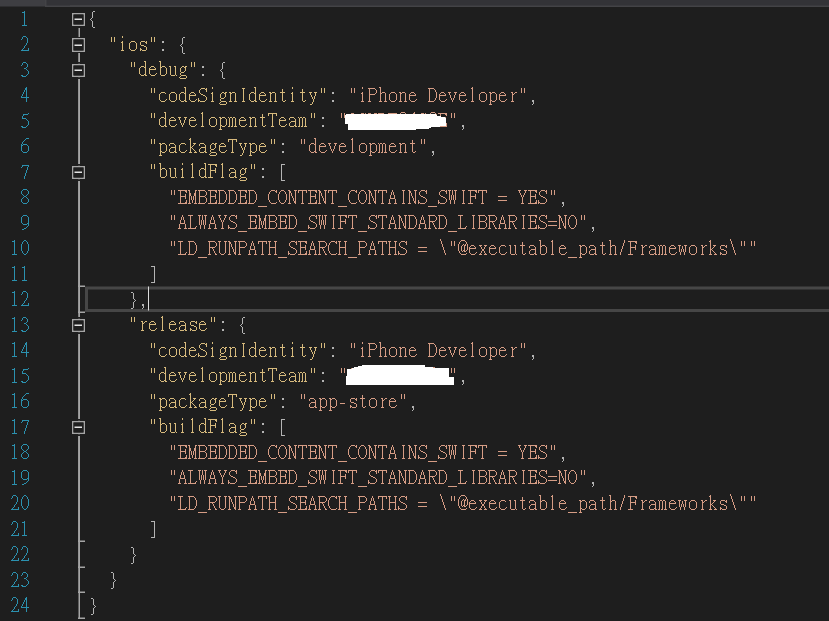
https://cordova.apache.org/docs/en/latest/guide/platforms/ios/index.html#using-buildjson
4.請記得使用Release,不要用Debug,要不然無法remote debug
若未用Release,會出現如下訊息,無法debug

將偵錯工具連接至遠端 Apache Cordova 應用程式時,發生逾時。請查看輸出視窗,以取得 JavaScript 主控台輸出。
找不到您要嘗試偵錯的應用程式。請確定裝置已連線、喚醒且解除鎖定。此外,也請確定其已啟用 Web Inspector。
The application you are trying to debug could not be found.
Make sure the device is connected, active, and unlocked. Also,
make sure that it is with the Web Inspector enabled.
網路上關於此訊息有建議一些解法,最終是用Release就成功,其它建議說明如下,以備未來有問題可參考
1) 【OS X】:Safari → 偏好设置 → 高级 → 在菜单栏中显示“开发”菜单
2) 於Macbook執行remotebuild程式後,停子remotebuild後,
   執行remotebuild saveconfig,
   用vi開啟RemoteBuild.config檔,修改以下2設定為60000後存檔
       appLaunchStepTimout : 60000 (1 min)
       emulatorLaunchTimeout : 60000 (1 min)
再重新啟動remotebuild
3) 模擬器 -> 設定(Settings) -> General -> Reset -> Reset all Settings
4) Macbook模擬器的名稱需與visual studio所選的一致
3.visual studio debug macbook上模擬器畫面

四、開啟Xcode直接debug Cordova 專案 :
1) Visual Studio 2017 \ Debug \ iOS \ 選模擬器類的直接Debug
2) 最後會於Macbook上的此路徑的Applications\Xcode.app\Contents\Developer\Platforms\iPhoneOS.platform\DeviceSupport\產生序號路徑,
並至[序號]\cordovaApp\platforms\ios\可開啟此xcode專案專案 [project Name].xcodeproj,
當然也可直接在xcode上debug。
Ref.https://docs.microsoft.com/en-us/visualstudio/cross-platform/tools-for-cordova/first-steps/ios-guide