1.先使用Adobe Acrobat Pro DC 產生 Field Properties(Edit PDF => Prepare Form)

2.下載iText7
http://developers.itextpdf.com/itext-7-java
3.程式如下
import com.itextpdf.forms.PdfAcroForm;
import com.itextpdf.forms.fields.PdfFormField;
import com.itextpdf.io.font.PdfEncodings;
import com.itextpdf.kernel.color.Color;
import com.itextpdf.kernel.font.PdfFont;
import com.itextpdf.kernel.font.PdfFontFactory;
import com.itextpdf.kernel.pdf.*;

ublic class testPDF {
    public static final String SRC = "pdf/src/subscribe.pdf";
    public static final String DEST = "pdf/dest/subscribe_result.pdf";

    public static void main(String args[]) throws IOException {
        new testPDF().manipulatePdf(SRC, DEST);
    }

    public void manipulatePdf(String src, String dest) throws IOException {
        //Initialize PDF document
        PdfDocument pdfDoc = new PdfDocument(new PdfReader(src), new PdfWriter(dest));

        PdfAcroForm form = PdfAcroForm.getAcroForm(pdfDoc, true);
        Map<String, PdfFormField> fields = form.getFormFields();
        //中文字issue
        PdfFont font = PdfFontFactory.createFont("font/kaiu.ttf", PdfEncodings.IDENTITY_H, true);
        fields.get("personal.name").setFont(font);
        fields.get("personal.loginname").setFont(font);
        fields.get("personal.password").setFont(font);
        fields.get("personal.reason").setFont(font);

        fields.get("personal.name").setValue("測試名字").setBackgroundColor(Color.ORANGE);
        fields.get("personal.loginname").setValue("NickName").setBackgroundColor(Color.WHITE);
        fields.get("personal.password").setValue("a12345678").setBackgroundColor(Color.WHITE);
        fields.get("personal.reason").setValue("原因是...").setBackgroundColor(Color.WHITE);

        form.flattenFields();
        pdfDoc.close();
    }
}
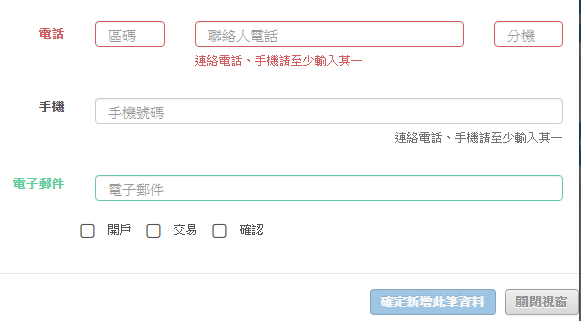
4.執行後產生之PDF如下圖

5.若使用iText5,中文字的處理如下範例
        PdfReader reader = new PdfReader(src);
        PdfStamper stamper = new PdfStamper(reader,
                new FileOutputStream(dest));

        AcroFields fields = stamper.getAcroFields();
        //中文字處理
        BaseFont font = BaseFont.createFont("font/kaiu.ttf", BaseFont.IDENTITY_H, BaseFont.EMBEDDED );
        fields.setFieldProperty("name","textfont",font,null);
        fields.setField("name", "ROC 台灣");

        stamper.setFormFlattening(true);
        stamper.close();
        reader.close();