1.將www/index.html改為main.html
2.新增新的index.html,內容如下
<!doctype html> <html> <head> <title>tittle</title> window.location=’./main.html’; <body> </body> </html>
調整原因:因為原index.html內容過大造成啟動時異常,故用小的網頁內容取代再連結至原網頁即可修正此問題。
1.將www/index.html改為main.html
2.新增新的index.html,內容如下
<!doctype html> <html> <head> <title>tittle</title> window.location=’./main.html’; <body> </body> </html>
調整原因:因為原index.html內容過大造成啟動時異常,故用小的網頁內容取代再連結至原網頁即可修正此問題。

cordova build android出現如下錯誤訊息

在專案的以下兩個檔案內
/platforms/build.gradle
/platforms/CordovaLib/build.gradle
將此行
mavenCentral()
全部替換成
maven {
    url "http://repo1.maven.org/maven2"
}
因https執行有問題,故改為http執行

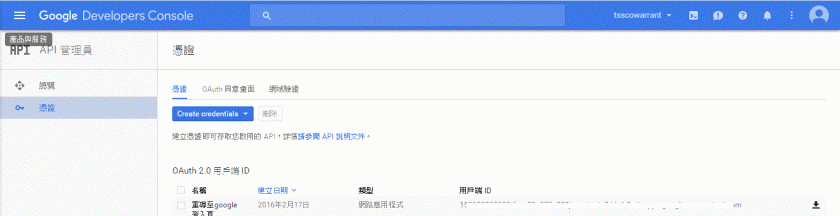
1.登入google developer console
https://console.developers.google.com
2.點選API管理員

3.申請憑證:點選"Create credentials" Button
選擇OAuth用戶端ID

應用程式類型:請選"網路應用程式"
名稱:請輸入用戶可辨認名稱
已授權的重新導向URI:請輸入授權後欲連至那個網頁做後續資料存取
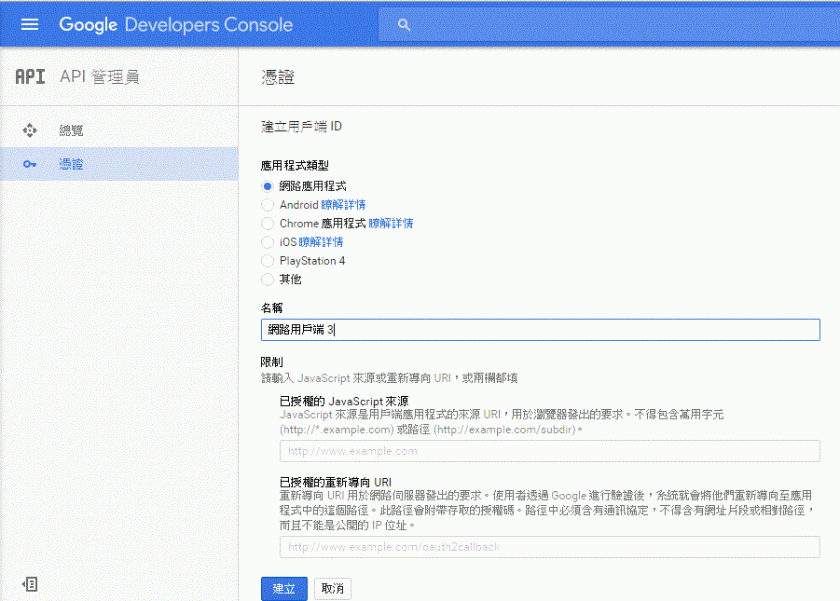
按"建立"Button後即可至第一頁下載憑證,憑證內容為json格式,如下
{“web":{“client_id":"…","project_id":"…","auth_uri":"https://accounts.google.com/o/oauth2/auth","token_uri":"https://accounts.google.com/o/oauth2/token","auth_provider_x509_cert_url":"https://www.googleapis.com/oauth2/v1/certs","client_secret":"…","redirect_uris":[“http://localhost/warrantweb/Auth_google.action"]}}

試了server端的java,一直卡在呼叫google ssl憑證失效的問題,還未找到google java api要如何調整,因此先調成javascript呼叫,試出來的流程
1.登入:連結此段
document.location.href = “https://accounts.google.com/o/oauth2/auth?response_type=token&client_id={ 向google申請的client id }&redirect_uri={ 向google申請欲導向的網頁url }&scope=https%3A%2F%2Fwww.googleapis.com%2Fauth%2Fuserinfo.profile+https%3A%2F%2Fwww.googleapis.com%2Fauth%2Fuserinfo.email";
response_type原本是傳code,會在google認證完後將資料傳到設定欲導向的網頁url,並在url後帶參數code (Ex. {url}?code=……),此段一直在研究如何透過此code再向google取得access token,後來發現只要將此參數帶入token值,即會直接回傳access token,且若已登入按過允許此應用程式存取,則不用再登入,而直接連至欲導向的網頁url,並將access token帶至hash (Ex. {url}#code=…..)
2.存取客戶留存在google的資料
javascript 如下
function getPageParam(paramid) {
	var rName = new RegExp("(\\?(.*))?$");
	var getcatch = document.location.hash.replace('#','');
	var t = getcatch.match(/([^&=]+)=([^=&]+)/g);
	for (var l = 0; l < t.length; l++){
       	       	var r = t[l];
		var tt = r.match(/([^&=]+)=([^=&]+)/);
		if (tt && tt[1]==paramid)
			return tt[2];
    }
}

function validateToken() {
    $.ajax({
        url: 'https://www.googleapis.com/oauth2/v1/tokeninfo?access_token=' + getPageParam("access_token"),
        data: null,
        success: function(response){
            getUserInfo();
        },
        error: function(error) {
            console.log('Our token is not valid....');
        },
        dataType: "jsonp"
    });
}

function getUserInfo() {
    $.ajax({
        url: 'https://www.googleapis.com/oauth2/v1/userinfo?access_token=' + getPageParam("access_token"),
        data: null,
        success: function(response) {
            $('#user').html(response.name);
        },
        dataType: "jsonp"
    });
}

validateToken();

spring + hibernate + mysql使用c3p0 connection pool會出現
Caused by: com.mysql.jdbc.exceptions.jdbc4.CommunicationsException: The last packet successfully received from the server was 52,924,331 milliseconds ago. The last packet sent successfully to the server was 52,924,331 milliseconds ago. is longer than the server configured value of ‘wait_timeout’. You should consider either expiring and/or testing connection validity before use in your application, increasing the server configured values for client timeouts, or using the Connector/J connection property ‘autoReconnect=true’ to avoid this problem.
在網路上搜尋了近10天的文章,也試了不少方式,總結大約有三種說法
1.若是用JDBC沒有用connection pool
設定如下:
<bean id="dataSource" class="org.springframework.jdbc.datasource.DriverManagerDataSource">
<property name="driverClassName">
<value>com.mysql.jdbc.Driver</value>
</property>
<property name="jdbcUrl" value="jdbc:mysql://<ip>:<port>/<dbname>?characterEncoding=utf-8&autoReconnect=true" />
…
</bean>
2.若是用hibernate connection pool
<bean id="sessionFactory" class="org.springframework.orm.hibernate5.LocalSessionFactoryBean">
<property name="dataSource" ref="dataSource" />
<property name="hibernateProperties">
<props>
<prop key="hibernate.dialect">org.hibernate.dialect.MySQLDialect</prop>
<prop key="hibernate.show_sql">true</prop>
…
<prop key="hibernate.connection.autoReconnect">true</prop>
<prop key="hibernate.connection.autoReconnectForPools">true</prop>
<prop key="hibernate.connection.is-connection-validation-required">true</prop>
…
</props>
</property>
</bean>
3.若是用c3p0 connection pool
<bean id="sessionFactory" class="org.springframework.orm.hibernate5.LocalSessionFactoryBean">
<property name="dataSource" ref="dataSource" />
<property name="hibernateProperties">
<props>
<prop key="hibernate.dialect">org.hibernate.dialect.MySQLDialect</prop>
<prop key="hibernate.show_sql">true</prop>
…
<prop key="hibernate.c3p0.max_size">10</prop>
<prop key="hibernate.c3p0.min_size">1</prop>
<prop key="hibernate.c3p0.idle_test_period">1</prop>
<prop key="hibernate.c3p0.acquire_increment">1</prop>
<prop key="hibernate.c3p0.timeout">30</prop>
<prop key="hibernate.c3p0.validate">true</prop>
<prop key="hibernate.c3p0.initial_pool_size">3</prop>
<prop key="hibernate.c3p0.idleConnectionTestPeriod">100</prop>
<prop key="hibernate.c3p0.preferredTestQuery">SELECT 1 from dual</prop>
<prop key="hibernate.c3p0.testConnectionOnCheckout">true</prop>
<prop key="hibernate.c3p0.testConnectionOnCheckin">true</prop>
<prop key="hibernate.c3p0.maxConnectionAge">180</prop>
<prop key="hibernate.c3p0.acquireRetryDelay">30</prop>
<prop key="hibernate.c3p0.acquireRetryAttempts">20</prop>
<prop key="hibernate.c3p0.breakAfterAcquireFailure">false</prop>
…
</props>
</property>
</bean>
一直以為用的是c3p0,昨天看log竟然沒有c3p0的內容
後來試出來是一直用到的是hibernate的pool,而非c3p0
<prop key="hibernate.provider_class">org.hibernate.connection.C3P0ConnectionProvider</prop>
應改成
<prop key="hibernate.connection.provider_class">org.hibernate.connection.C3P0ConnectionProvider</prop>
後雖有讀到卻有找不到其它class的錯誤。
只好試另一種方式dataSource設定使用class com.mchange.v2.c3p0.ComboPooledDataSource,需下載c3p0 jar檔(我使用c3p0-0.9.5.2.jar)
<bean id="dataSource" class="com.mchange.v2.c3p0.ComboPooledDataSource" destroy-method="close">
<property name="driverClass">
<value>com.mysql.jdbc.Driver</value>
</property>
<property name="jdbcUrl" value="jdbc:mysql://127.0.0.1:3306/dbname?characterEncoding=utf-8&autoReconnect=true" />
…
</bean>
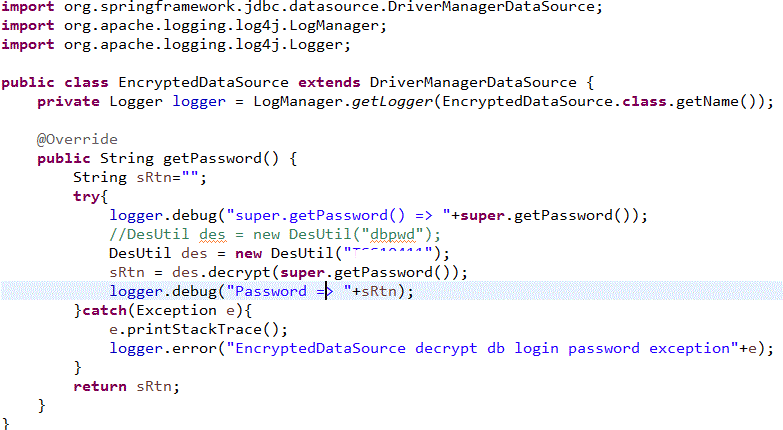
一直不想調這個地方,是因為這個設定為了將DB密碼加密做設定,寫了一個加密的class繼承org.springframework.jdbc.datasource.DriverManagerDataSource,設定如下
<bean id="dataSource" class="com.xxx.util.EncryptedDataSource">
…
後來有找到com.mchange.v2.c3p0.ComboPooledDataSource將DB密碼用成設定的方式
1.applicationContext.xml設定如下
<bean id="dataSource" class="com.mchange.v2.c3p0.ComboPooledDataSource" destroy-method="close">
<property name="driverClass">
<value>com.mysql.jdbc.Driver</value>
</property>
<property name="jdbcUrl" value="jdbc:mysql://127.0.0.1:3306/dbname?characterEncoding=utf-8&autoReconnect=true" />
<property name="acquireIncrement" value="1″/>
<property name="idleConnectionTestPeriod" value="300″/>
<property name="maxPoolSize" value="10″/>
<property name="minPoolSize" value="1″/>
<property name="initialPoolSize" value="1″ />
<property name="numHelperThreads" value="3″/>
<property name="maxIdleTime" value="1200″ />
<property name="acquireRetryAttempts" value="2″/>
<property name="preferredTestQuery" value=" select 1 from dual “/>
<property name="testConnectionOnCheckout" value="true"/>
<property name="testConnectionOnCheckin" value="true"/>
<property name="maxConnectionAge" value="1800″ />
<property name="properties" ref="dataSourceProperties"/>
</bean>
<bean id="dataSourceProperties" class="com.xxx.util.PropertiesEncryptFactoryBean">
<property name="properties">
<props>
<prop key="user">dbuser</prop>
<prop key="password">99d48e6365c86d26d21ea0f0ac1458ef</prop>
</props>
</property>
</bean>
2.PropertiesEncryptFactoryBean的寫法

1.為了選取自已上傳的圖檔

增加如下紅字
tinymce.init({selector: elem,
theme: “modern",
…
file_browser_callback : myFileBrowser,
});
function myFileBrowser (field_name, url, type, win) {
var cmsURL = window.location.toString();
if (cmsURL.indexOf(“?") < 0) {
cmsURL = cmsURL + “?type=" + type;
} else {
cmsURL = cmsURL + “&type=" + type;
}
cmsURL = “WAImage.action?page=9″;
tinyMCE.activeEditor.windowManager.open({
file : cmsURL,
title : ‘請選取上傳圖檔’,
width : $(window).width()-50,
height : $(window).height()-50,
resizable : “yes",
inline : “yes",
close_previous : “no"
}, {
window : win,
input : field_name
});
return false;
}
新開的圖檔選擇頁需新增如下
$(document).ready(function() {
tinyMCEPopup.onInit.add(FileBrowserDialogue.init,FileBrowserDialogue);
});
var FileBrowserDialogue = {
init : function () {
// Here goes your code for setting your custom things onLoad.
},
mySubmit : function () {
// Here goes your code to insert the retrieved URL value into the original dialogue window.
// For example code see below.
}
}
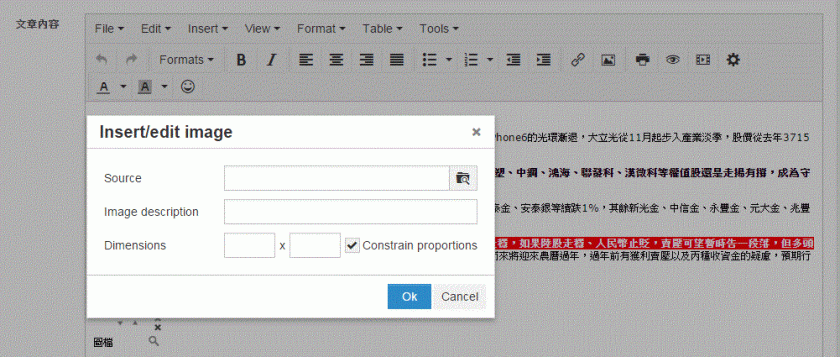
選取完圖檔的回傳方式如下,即可將圖檔連結回傳至Insert/Edit Image對話框內的Source欄位:
var win = tinyMCEPopup.getWindowArg(“window");
win.document.getElementById(tinyMCEPopup.getWindowArg(“input")).value = imgUrl;
if (win.getImageData) win.getImageData();
tinyMCEPopup.close();
2.畫面無法出現編輯頁面(如下圖),而只出現<frameset>原始的樣子

後來發現是因為我用動態的呼叫方式,沒有每次重load網頁,後改成window.location.reload();就OK了
3.取出字串其format不管是raw或html均會出現<html>.<br/>..<head>…<body>,且每次都會在<body>的最前頭加上<p><br/></p>,造成最後顯示會前面愈空愈大
var blogContent = tinyMCE.get(‘blog_content’).getContent({format : ‘raw’});
加上以下紅字
tinymce.init({selector: elem,
…
forced_root_block : false,
force_br_newlines : false,
force_p_newlines : false
});
仍有<html>.<br/>..<head>…<body>,但至少每次<body>最前頭不會加上<p><br/></p>,而<br/>變成\n
故替換掉\n字元
blogContent = blogContent.replace(/(?:\r\n|\r|\n)/g, “);
存入資料庫則只取body內的html
blogContent = parseHTML(blogContent).getElementsByTagName(‘body’)[0].innerHTML;

因為hibernate每次存取DB的速度過慢,一次查詢竟然需要5秒鐘,
經查發現我寫的程式碼在初始化spring bean Dao以下4行的前3行就是問題的所在:
GenericXmlApplicationContext ctx = new GenericXmlApplicationContext();
ctx.load(new ClassPathResource(“../applicationContext.xml"));
ctx.refresh();
waServiceDao = ctx.getBean(“WAServiceDao",WAServiceDao.class);
故將前3行改為static的方式,不要每次存取DB都做初始化
private static GenericXmlApplicationContext ctx = null;
static {
ctx = new GenericXmlApplicationContext();
ctx.load(new ClassPathResource(“../applicationContext.xml"));
ctx.refresh();
}
但竟變成每次查詢都有db cache,明明資料庫已異動,但怎麼查都是舊資料,上網google發現hibernate cache有level 1及2,level 1是session level,level 2是application level,原本一直往level 2的方向查,但怎麼調整還是有cache (applicationContext.xml加上如下指令也不work)
<prop key="current_session_context_class">org.hibernate.context.ManagedSessionContext</prop>
<prop key="hibernate.cache.use_second_level_cache">false</prop>
<prop key="hibernate.cache.use_query_cache">false</prop>
<prop key="cache.provider_class">org.hibernate.cache.NoCacheProvider</prop>
後來想到有可能是卡在level 1 – session cache,全部共用hibernate同一個session,故調整如下紅字,就沒cache了~
protected Session getSession() {
if (session == null || session.isOpen() == false)
session = sessionFactory.openSession();
else
session.clear();
return session;
}

使用
Query query = getSession().createQuery(" FROM WABlog c Order By id desc");
query.setMaxResults(iLastRecord);
query.setFirstResult(0);
執行後均會失敗,出現"org.hibernate.exception.SQLGrammarException: could not extract ResultSet."
終於找到的解法是在applicationContext.xml (我是用spring)
將
<prop key="hibernate.dialect">org.hibernate.dialect.SQLServerDialect</prop>
改為
<prop key="hibernate.dialect">org.hibernate.dialect.SQLServer2012Dialect</prop>
若不是使用spring,調整hibernate.cfg.xml的設定
<property name="dialect">org.hibernate.dialect.SQLServerDialect</property>
改為
<property name="dialect">org.hibernate.dialect.SQLServer2012Dialect</property>
應該也能work…

1.程式內寫法依
(1) import log4j class
import org.apache.logging.log4j.LogManager;
import org.apache.logging.log4j.Logger;
import org.apache.logging.log4j.ThreadContext;
(2) 初始化logger
public class MyClass {
protected Logger logger = LogManager.getLogger(this.getClass().getName());
protected MyClass() {
ThreadContext.put(“className", this.getClass().getName());
}
}
(3) 使用方法同一般寫法logger.info(…)、logger.debug(…)…等
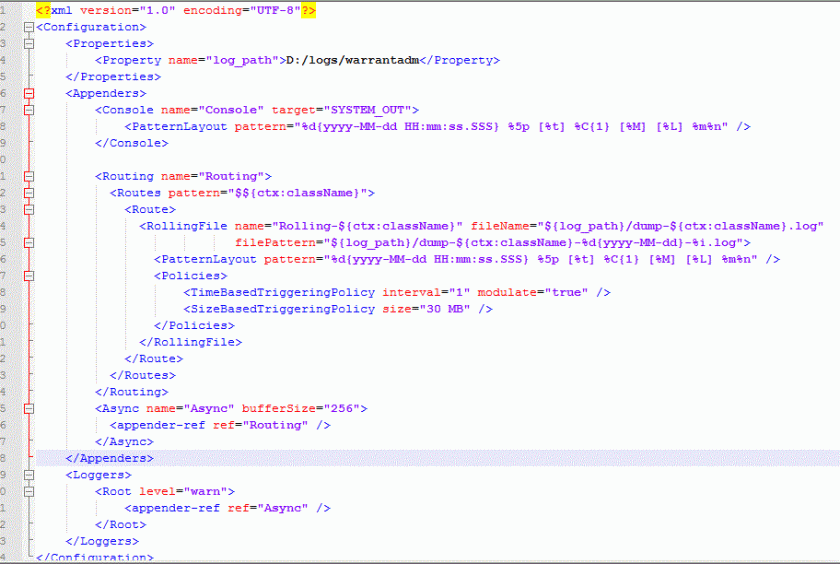
2.Loggers (設定appender-ref)
=> Appenders/Async(設定appender-ref)
=> Appenders/Routing/Routes的pattern使用$${ctx:className}以對應到程式中ThreadContext.put(“className", this.getClass().getName());
=> Appenders/Routing/Routes/Route/RollingFile的name、fileName、filePattern內的設定均使用${ctx:className}代表log的名稱
![1[1].gif](https://myyhhuang.com/wp-content/uploads/2015/12/111.gif?w=840)