1.basicType.ts
//1.boolean
console.log('1.boolean');

let flag: boolean = true;
console.log('flag: ' + flag);

//2.number
console.log('2.number');

let binaryLiteral: number = 0b11010;
let octalLiteral: number = 0o622;
let decLiteral: number = 12;
let hexLiteral: number = 0xb00a;

console.log('binaryLiteral :' + binaryLiteral);
console.log('octalLiteral :' + octalLiteral);
console.log('decLiteral :' + decLiteral);
console.log('hexLiteral :' + hexLiteral);

//3.string
console.log('3.string');

let prog: string = "Angular 2";
let seconds: number = 55;
let data: string = `這程式是 ${prog}, 經過 ${ seconds } 秒`;

console.log('prog :' + prog);
console.log('seconds :' + seconds);
console.log('data :' + data);

//4.number array
console.log('4.number array');
let numarr1: number[] = [4, 3, 2, 1];
let numarr2: Array = [1, 2];

console.log('numarr1.length :' + numarr1.length);
numarr1.forEach(function (num1) {
    console.log('num1: ' + num1);
}.bind(this));

console.log('numarr2.length :' + numarr2.length);
numarr2.forEach(function (num2) {
    console.log('num2: ' + num2);
}.bind(this));

//5.mix array
console.log('5.mix array');
let mixarr: [string, string, number, number];
mixarr = ['string1', 'string2', 2, 1];

console.log('mixarr.length :' + mixarr.length);
mixarr.forEach(function (data1) {
    console.log('data1: ' + data1);
}.bind(this));

//6.enum
console.log('6.enum');
enum Shape { Circle, Rect, Oval };
let s: Shape = Shape.Oval;
console.log('s: ' + s);

enum Shape2 { Circle = 9, Rect, Oval = 6 };
let s2: Shape2 = Shape2.Rect;
console.log('s2: ' + s2);

//7.any
console.log('7.any');
let any1: any = 1;
console.log('any1: ' + any1);
//console.log('any1.ifItExists(): ' + any1.ifItExists());
console.log('any1.toFixed(): ' + any1.toFixed());

any1 = '程式';
console.log('any1: ' + any1);
//console.log('any1.ifItExists(): ' + any1.ifItExists());
//console.log('any1.toFixed(): ' + any1.toFixed());

any1 = false;
console.log('any1: ' + any1);
//console.log('any1.ifItExists(): ' + any1.ifItExists());
//console.log('any1.toFixed(): ' + any1.toFixed());

let array: any[] = [ true, "hello", 333 ];
array.forEach(function (arrdata1) {
    console.log('arrdata1: ' + arrdata1);
}.bind(this));

array[2] = "yes";
array.forEach(function (arrdata2) {
    console.log('arrdata2: ' + arrdata2);
}.bind(this));

//8.null and undefined
console.log('8.null and undefined');
let nulldata : number;
nulldata = 3;
console.log('nulldata: ' + nulldata);

nulldata = undefined;
console.log('nulldata: ' + nulldata);

nulldata = null;
console.log('nulldata: ' + nulldata);

let nulldata2 : number | undefined;
nulldata2 = 3;
console.log('nulldata2: ' + nulldata2);

nulldata2 = undefined;
console.log('nulldata2: ' + nulldata2);

nulldata2 = null;
console.log('nulldata2: ' + nulldata2);

let nulldata3 : number | null | undefined;
nulldata3 = 3;
console.log('nulldata3: ' + nulldata3);

nulldata3 = undefined;
console.log('nulldata3: ' + nulldata3);

nulldata3 = null;
console.log('nulldata3: ' + nulldata3);

//9.void
console.log('9.void');
function func1(): void {
    console.log('test for func1()');
}

func1();

//10.never
console.log('10.never');
let val1: never;
let val2: number;

//compiler => error TS2322: Type '333' is not assignable to type 'never'.
//val1 = 333;
//val1 = (() => { throw new Error('val1: Exception occur for nerver') })();
//val2 = (() => { throw new Error('val2: Exception occur for nerver') })();

//11.const
const CONSTVAL = 123;
const hello = {
  title: "Hi",
  content: CONSTVAL
};

console.log('hello.title: ' + hello.title);
console.log('hello.content: ' + hello.content);

//12.數值結構
console.log(`12.數值結構`);
let fromData = [1, 3];
let [one, three] = fromData;

console.log('one: ' + one);
console.log('three: ' + three);

function func2([first, second]: [number, number]) {
    console.log(first + second);
}

func2([33, 44]);

let [first, ...rest] = [4, 3, 2, 1];
console.log('first: ' + first);
console.log('rest: ' + rest);

//13.結構
console.log(`13.結構`);
let arraytest = { a: 3, b: 15, w: 6, h: 30};
let { a, b, w, h } = arraytest;
console.log(a, b, w, h);
2.compiler
tsc basicType.ts
3.產出的basicType.js
//1.boolean
console.log('1.boolean');
var flag = true;
console.log('flag: ' + flag);
//2.number
console.log('2.number');
var binaryLiteral = 26;
var octalLiteral = 402;
var decLiteral = 12;
var hexLiteral = 0xb00a;
console.log('binaryLiteral :' + binaryLiteral);
console.log('octalLiteral :' + octalLiteral);
console.log('decLiteral :' + decLiteral);
console.log('hexLiteral :' + hexLiteral);
//3.string
console.log('3.string');
var prog = "Angular 2";
var seconds = 55;
var data = "\u9019\u7A0B\u5F0F\u662F " + prog + ", \u7D93\u904E " + seconds + " \u79D2";
console.log('prog :' + prog);
console.log('seconds :' + seconds);
console.log('data :' + data);
//4.number array
console.log('4.number array');
var numarr1 = [4, 3, 2, 1];
var numarr2 = [1, 2];
console.log('numarr1.length :' + numarr1.length);
numarr1.forEach(function (num1) {
    console.log('num1: ' + num1);
}.bind(this));
console.log('numarr2.length :' + numarr2.length);
numarr2.forEach(function (num2) {
    console.log('num2: ' + num2);
}.bind(this));
//5.mix array
console.log('5.mix array');
var mixarr;
mixarr = ['string1', 'string2', 2, 1];
console.log('mixarr.length :' + mixarr.length);
mixarr.forEach(function (data1) {
    console.log('data1: ' + data1);
}.bind(this));
//6.enum
console.log('6.enum');
var Shape;
(function (Shape) {
    Shape[Shape["Circle"] = 0] = "Circle";
    Shape[Shape["Rect"] = 1] = "Rect";
    Shape[Shape["Oval"] = 2] = "Oval";
})(Shape || (Shape = {}));
;
var s = Shape.Oval;
console.log('s: ' + s);
var Shape2;
(function (Shape2) {
    Shape2[Shape2["Circle"] = 9] = "Circle";
    Shape2[Shape2["Rect"] = 10] = "Rect";
    Shape2[Shape2["Oval"] = 6] = "Oval";
})(Shape2 || (Shape2 = {}));
;
var s2 = Shape2.Rect;
console.log('s2: ' + s2);
//7.any
console.log('7.any');
var any1 = 1;
console.log('any1: ' + any1);
//console.log('any1.ifItExists(): ' + any1.ifItExists());
console.log('any1.toFixed(): ' + any1.toFixed());
any1 = '程式';
console.log('any1: ' + any1);
//console.log('any1.ifItExists(): ' + any1.ifItExists());
//console.log('any1.toFixed(): ' + any1.toFixed());
any1 = false;
console.log('any1: ' + any1);
//console.log('any1.ifItExists(): ' + any1.ifItExists());
//console.log('any1.toFixed(): ' + any1.toFixed());
var array = [true, "hello", 333];
array.forEach(function (arrdata1) {
    console.log('arrdata1: ' + arrdata1);
}.bind(this));
array[2] = "yes";
array.forEach(function (arrdata2) {
    console.log('arrdata2: ' + arrdata2);
}.bind(this));
//8.null and undefined
console.log('8.null and undefined');
var nulldata;
nulldata = 3;
console.log('nulldata: ' + nulldata);
nulldata = undefined;
console.log('nulldata: ' + nulldata);
nulldata = null;
console.log('nulldata: ' + nulldata);
var nulldata2;
nulldata2 = 3;
console.log('nulldata2: ' + nulldata2);
nulldata2 = undefined;
console.log('nulldata2: ' + nulldata2);
nulldata2 = null;
console.log('nulldata2: ' + nulldata2);
var nulldata3;
nulldata3 = 3;
console.log('nulldata3: ' + nulldata3);
nulldata3 = undefined;
console.log('nulldata3: ' + nulldata3);
nulldata3 = null;
console.log('nulldata3: ' + nulldata3);
//9.void
console.log('9.void');
function func1() {
    console.log('test for func1()');
}
func1();
//10.never
console.log('10.never');
var val1;
var val2;
//compiler => error TS2322: Type '333' is not assignable to type 'never'.
//val1 = 333;
//val1 = (() => { throw new Error('val1: Exception occur for nerver') })();
//val2 = (() => { throw new Error('val2: Exception occur for nerver') })();
//11.const
var CONSTVAL = 123;
var hello = {
    title: "Hi",
    content: CONSTVAL
};
console.log('hello.title: ' + hello.title);
console.log('hello.content: ' + hello.content);
//12.數值結構
console.log("12.\u6578\u503C\u7D50\u69CB");
var fromData = [1, 3];
var one = fromData[0], three = fromData[1];
console.log('one: ' + one);
console.log('three: ' + three);
function func2(_a) {
    var first = _a[0], second = _a[1];
    console.log(first + second);
}
func2([33, 44]);
var _a = [4, 3, 2, 1], first = _a[0], rest = _a.slice(1);
console.log('first: ' + first);
console.log('rest: ' + rest);
//13.結構
console.log("13.\u7D50\u69CB");
var arraytest = { a: 3, b: 15, w: 6, h: 30 };
var a = arraytest.a, b = arraytest.b, w = arraytest.w, h = arraytest.h;
console.log(a, b, w, h);
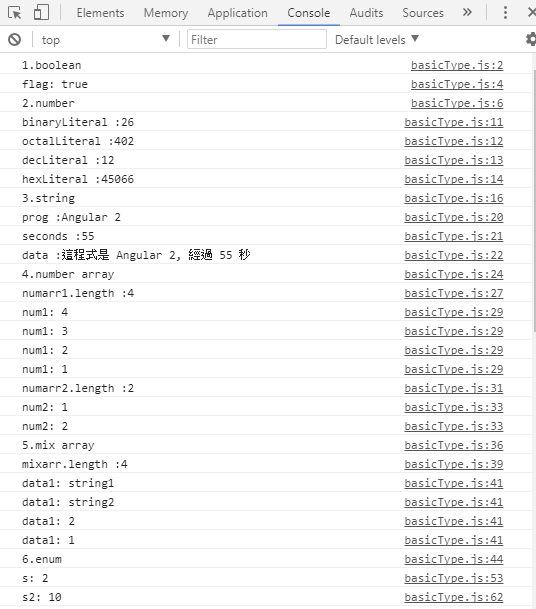
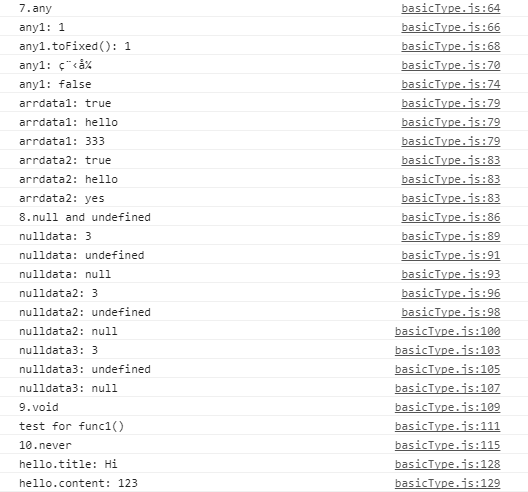
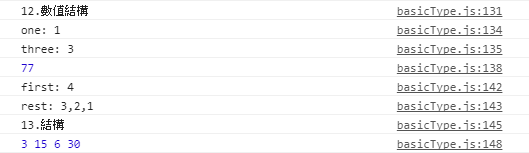
4.執行結果